

What if you could stop explaining kitchen layout principles to skeptical homeowners and start showing them the data in real-time? You know the friction of a client who wants a massive island but doesn't understand the 2023 NEC safety revisions regarding receptacle placement. Manual tape measurements often lead to expensive cabinet re-orders, while vague expectations turn into endless layout revisions. You need your design process to reflect your professional authority before the first demo hammer swings.
This guide helps you master the technical standards and modern workflows needed to design high-value, efficient spaces directly on the job site. We will cover the shift from the traditional "Work Triangle" to modern "Work Zones." You will see how tools like ArchKit Design use LiDAR scanning and AR visualization to eliminate measurement errors. We also cover the 2026 California accessibility codes and "electric-ready" mandates to keep your projects compliant. It is time to trade the office-dependent workflow for a mobile-first approach that delivers results in minutes. Deliver accuracy. Secure the contract.
Key Takeaways for Professionals:
- Shift to Work Zones. Replace the outdated Work Triangle for superior job-site efficiency.
- Master landing area rules. Ensure safety and utility around every major appliance.
- Optimize layout archetypes. Select L-shaped or Galley designs based on the specific room footprint.
- Fix dead corners. Deploy specialized hardware to eliminate wasted space and improve accessibility.
- Digitize your workflow with ArchKit. Use LiDAR and AR to finalize kitchen layout principles on-site and eliminate measurement errors.
Core Principles of Functional Space Planning
Stop guessing during the initial walkthrough. Mastering kitchen layout principles is the difference between a high-value referral and a project plagued by change orders. Functional design starts with the "Point of Use" rule. Store items exactly where the task happens. Heavy pots belong next to the range. Cutting boards belong in the prep zone. This logic reduces unnecessary steps and keeps the workflow tight. Every major appliance also requires a dedicated "Landing Area." This means providing at least 15 inches of clear countertop next to the refrigerator, oven, and sink. Without these landing spots, the kitchen becomes a safety hazard and a functional bottleneck.
Traffic flow is your next priority. You must minimize bottlenecks in multi-cook households. Map out the path from the entry to the refrigerator. If that path cuts directly through the primary prep space, the design will fail. Use a free kitchen design app like ArchKit Design to visualize these paths in AR during your first visit. Showing a client a digital overlay of their future traffic patterns prevents vague expectations from turning into layout revisions later.
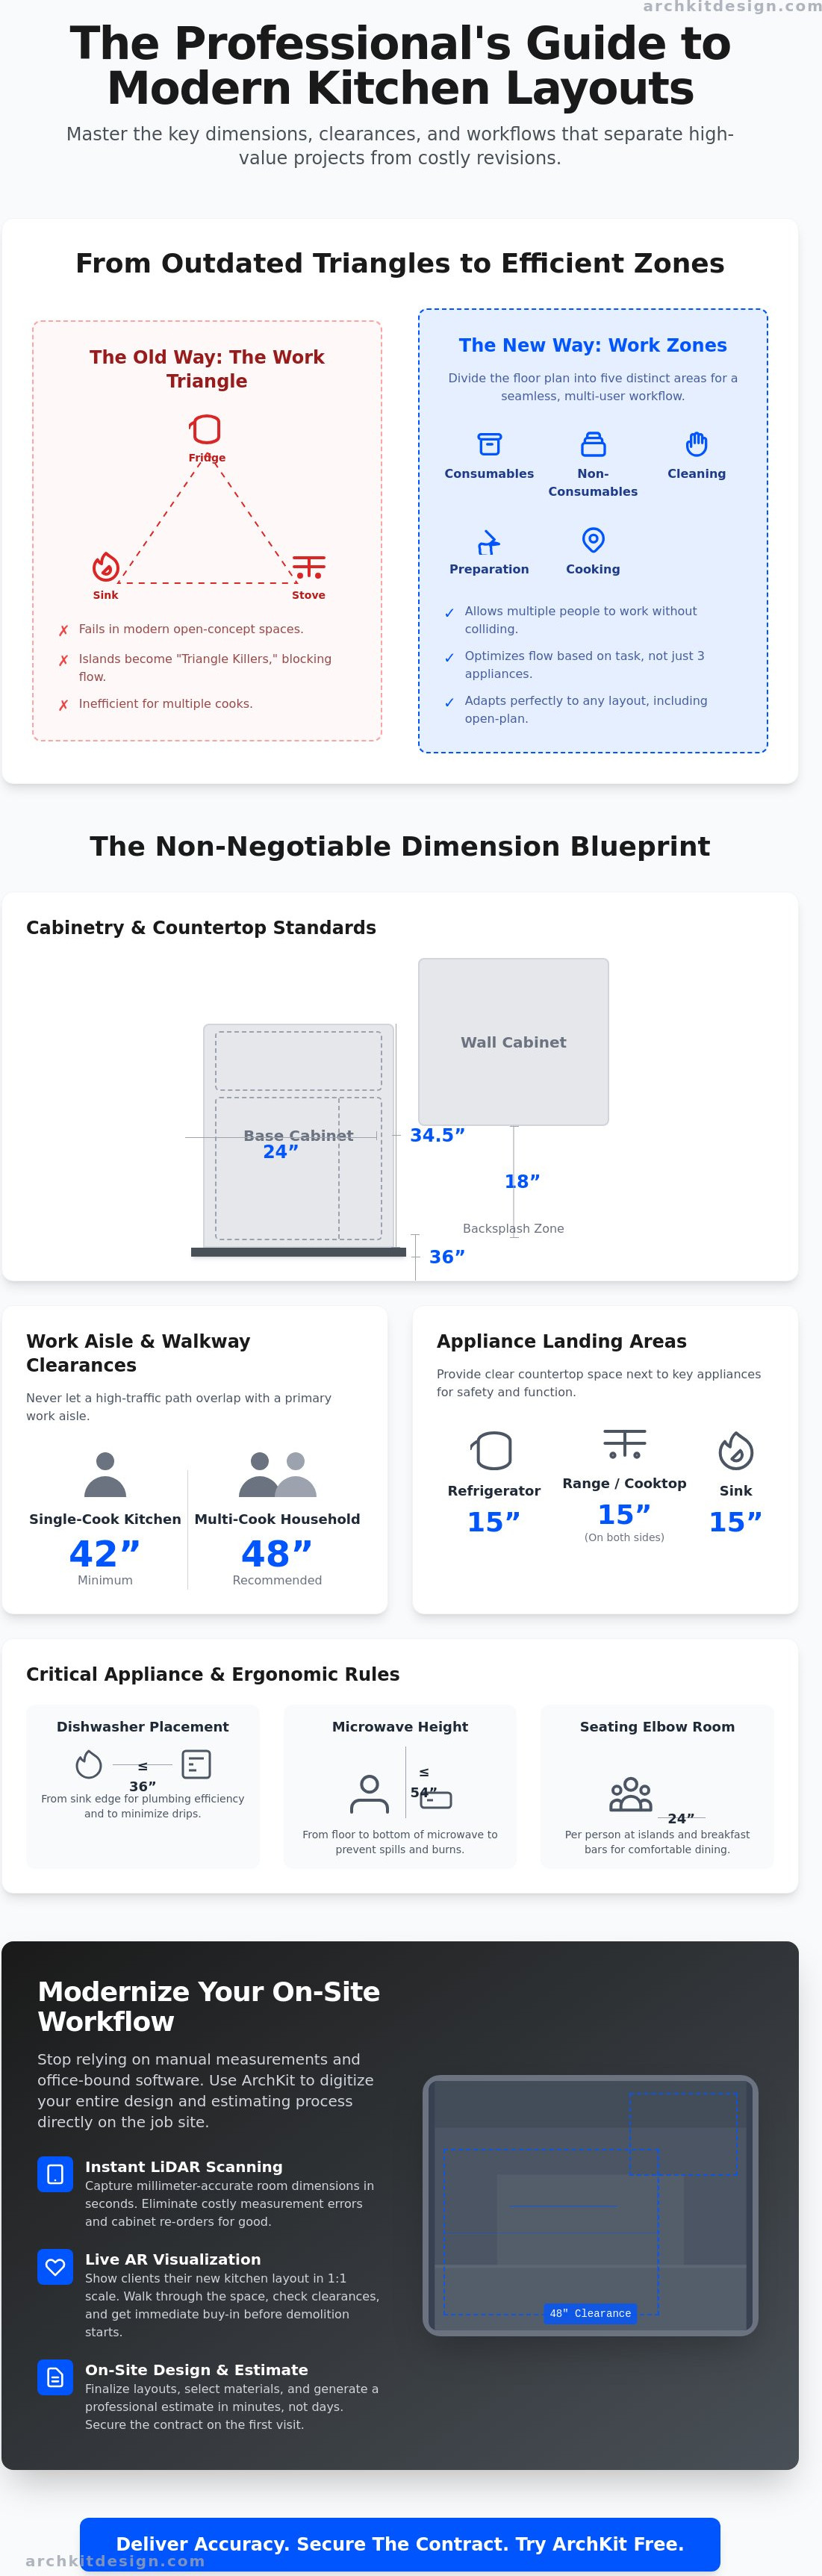
The Evolution of the Kitchen Work Triangle
The classic kitchen work triangle has been the industry standard for decades. It dictates that the total distance between the sink, refrigerator, and stove should not exceed 26 feet. While this works for small, enclosed rooms, it often fails in modern open-concept spaces. Large islands frequently act as "triangle killers," forcing homeowners to walk around obstacles. Shift your planning toward "Work Zones" instead. Divide the floor plan into five distinct areas: Consumables (pantry/fridge), Non-consumables (dishes), Cleaning (sink/dishwasher), Preparation, and Cooking. This zone-based approach allows multiple people to work simultaneously without colliding.
Primary Clearance and Traffic Standards
Precision in clearance is non-negotiable. For a single-cook kitchen, maintain a minimum walkway width of 42 inches. If your client has a multi-cook household, bump that requirement to 48 inches. You must also distinguish between a "Work Aisle" and a "Traffic Path." A work aisle is where the cook stands; a traffic path is the route people use to pass through the room. Never let a traffic path overlap with a work aisle. Finally, remember that 15 inches of countertop on both sides of a range is a critical safety standard. It prevents pot handles from overhanging the edge and provides an immediate spot for hot cookware. Stick to these technical rules to establish professional authority and ensure zero measurement errors during cabinet installation.
Standard Dimensions and Technical Clearance Rules
Successful kitchen layout principles rely on a rigid grid of technical standards. If your measurements are off by even half an inch, your fillers won't fit and your appliance doors won't clear. It starts with the foundation. Standard base cabinets are 24 inches deep and 34.5 inches high. Once you add a 1.5 inch countertop, you hit the industry-standard 36 inch finished height. These numbers aren't suggestions; they are the benchmarks for every other component in the room.
Cabinetry and Countertop Standards
Standardizing your layout around US standard cabinet sizes ensures that your design remains cost-effective and predictable. Wall cabinets typically sit at 12 or 15 inches deep. The most critical dimension here is the "Backsplash Zone." You must maintain an 18 inch vertical clearance between the countertop and the bottom of the wall cabinets. This space accommodates small appliances and ensures the workspace doesn't feel cramped. If you drop below 18 inches, you risk violating local codes and frustrating the homeowner with limited task space.
Appliance Integration and Clearance
Appliance placement is where most layout revisions happen. Keep the dishwasher within 36 inches of the sink edge. This proximity is vital for plumbing efficiency and minimizes floor drips during loading. For refrigerators, always account for the door swing and the manufacturer's required ventilation gap. A common error is placing a full-depth fridge next to a deep wall, preventing the door from opening past 90 degrees. This makes it impossible to remove crisper drawers. For microwaves, safety dictates a maximum height of 54 inches above the finished floor. Any higher, and the risk of spilling hot liquids on the user increases significantly.
Ergonomics also define the "Elbow Room" rule. When designing islands or breakfast bars, allocate 24 inches of width per person. This prevents guests from bumping shoulders and ensures a comfortable dining experience. You should also consider the "Countertop Reach" principle. Most prep tasks should occur within a 16 inch radius of the cook's primary standing position to minimize physical strain. Verifying these clearances on a chaotic job site is difficult with a manual tape. You can streamline your on-site consultations by using digital tools like ArchKit Design that flag clearance issues before you order materials. This proactive approach eliminates the collision errors that eat your profit margins.
Layout Archetypes and Strategic Selection
Selecting the right footprint is the first high-stakes decision in any remodel. You aren't just choosing an aesthetic; you're committing to a specific workflow that will define the homeowner's experience for decades. Modern kitchen layout principles favor adaptability. The L-shaped layout is the current industry gold standard for open-plan homes. It anchors two walls while leaving the center of the room open for a dining area or a large island. This configuration eliminates the "triangle killer" problem by keeping the primary traffic paths clear of the cooking zone. For contractors, the L-shape is a low-risk recommendation because it scales easily to almost any room size.
Tight urban remodels require a different strategy. The galley layout is the undisputed champion of efficiency in narrow spaces. By placing two parallel runs of cabinetry, you create a high-performance "cockpit" where the cook can reach every major appliance within a three-step radius. If the space allows for more volume, move to a U-shaped design. This archetype is ideal for households that demand maximum storage and dedicated work zones. It provides three full walls of cabinetry, allowing you to separate the cleaning zone from the prep zone entirely. Use ArchKit Design to toggle between these archetypes during your on-site consultation to show clients exactly how each choice impacts their available floor space.
Maximizing Small Footprints
In ADUs, studio apartments, or guest suites, every inch is a battle. When floor space is non-existent, recommend a one-wall layout. This keeps all plumbing and electrical on a single run, significantly reducing your rough-in costs. To make these spaces livable, you must master vertical storage. Use 42-inch upper cabinets that reach the ceiling to reclaim wasted volume. For more specific tight-space strategies, refer to the Small Kitchen Layout Planner. This resource helps you prioritize essentials without making the kitchen feel like a closet.
Island Design and Spacing Rules
Islands are the most requested feature in modern remodels, but they are also the most common source of layout errors. You must maintain a 36-inch minimum clearance rule around all sides of the island. If the island contains a dishwasher or oven, increase that clearance to 42 or 48 inches to allow for door swings and passage. Determine the island's size based on the "Functional Center" of the room, the spot where prep, cooking, and social interaction overlap. If you're integrating a sink or cooktop into the island, remember the 2023 NEC revisions. Receptacles on the vertical sides of islands no longer satisfy countertop requirements in many jurisdictions, so plan for pop-up outlets or specialized hardware early in the design phase.
Common Layout Pitfalls and Professional Fixes
Even a project with perfect measurements can fail if the underlying logic is flawed. Identifying common kitchen layout mistakes early saves you from expensive field modifications. One of the most frequent bottlenecks is the placement of back-to-back appliances. Don't place a dishwasher directly opposite a range or oven in a narrow galley. If both doors are open simultaneously, the walkway is completely blocked. This creates a safety hazard and a functional nightmare. Poor lighting is also a fundamental layout failure. If your task lighting sits behind the cook, they will work in their own shadow. Always align task lighting with the front edge of the upper cabinets to illuminate the workspace directly.
Managing Corner Cabinets and Blind Spots
The "Dead Corner" is where storage goes to die. You have three main ways to fix it. Lazy Susans are the budget-friendly standard. They provide decent access but often waste the back corners. Magic Corners or pull-out kidney shelves offer better volume utilization but require a higher hardware budget. In high-end designs, consider the "Corner Void" strategy. Close off the corner entirely. Use the extra space to install wider, more functional drawer banks on either side. This often provides more usable storage than a cramped corner unit. Always check the clearance for corner appliance handles. If a drawer handle hits the oven door, you will be replacing cabinet faces before the final walkthrough.
The 'Client Communication' Fix
Your job is to protect the client from their own bad ideas. Use established kitchen layout principles to say "no" to impractical requests. If a homeowner insists on a massive island that leaves only 30 inches of clearance, explain the "Safety vs. Style" trade-off immediately. Use 3D visualization within ArchKit Design to show them exactly how a person will get trapped between the island and the fridge. When they see the bottleneck in a digital model, the debate ends. This professional authority builds trust and eliminates the vague expectations that lead to late-stage revisions. Stop debating and start demonstrating. To streamline your next consultation and prove your expertise, get early access to ArchKit Design and show your clients the technical reality before the first cabinet is ordered.
Modernizing the Design Workflow with AR and LiDAR
Manual processes are the single biggest drain on your profit margins. Traditional field measurements are slow, prone to human error, and require hours of office-bound drafting before you can even present a quote. Modern technology has finally caught up to the job site. By integrating LiDAR and AR into your workflow, you can execute complex kitchen layout principles with digital precision in a fraction of the time. This mobile-first approach replaces stationary office equipment with a high-performance design platform that lives in your pocket.
Scanning for Accuracy: Beyond the Tape Measure
LiDAR scanning is no longer a luxury; it is a necessity for the modern contractor. Using the sensors found in devices like the iPhone 12 Pro and newer, you can capture 3D room data in seconds. This technology identifies wall irregularities and out-of-plumb corners that a standard tape measure often misses. Using the ArchKit Design kitchen design app, you can generate accurate 2D and 3D plans on-site, eliminating the need for manual data entry back at the office. You can verify clearance rules, such as the 42-inch work aisle or the 18-inch backsplash zone, before you even leave the driveway. This immediate validation ensures that your cabinet order is right the first time, preventing the measurement fatigue that leads to costly re-orders.
Closing the Sale with On-Site Visualization
Visualization is your most powerful closing tool. Most homeowners struggle to interpret 2D blueprints. Using AR, you can project a life-sized model of the new layout directly into their existing room. Show them exactly how an L-shaped configuration opens up their floor plan or how a new island will impact traffic flow. This real-time feedback loop reduces layout revisions by finalizing cabinet placement during the initial consultation. It moves the project from measurement to quote in a single visit. It removes the administrative burden and replaces it with the satisfaction of immediate results.
Adopting these tools isn't just about convenience; it is about professional authority. When you use digital workflows to enforce technical standards, you eliminate the vague expectations that cause project delays. You become the expert who delivers results, not just promises. Check out the pricing for professional design tools to see how you can modernize your toolkit today. Stop fighting your tape measure. Start using a mobile-first workflow that turns your phone into a high-performance design platform. Capture the data. Show the vision. Secure the contract.
Take Command of Your On-Site Design Workflow
Mastering kitchen layout principles is no longer a matter of manual sketches and guesswork. You've seen how technical clearances, smart work zones, and strategic archetype selection define a successful project. These standards ensure safety, maximize storage, and prevent the "dead corner" bottlenecks that frustrate homeowners. Knowledge alone isn't enough to stay competitive in a fast-paced market. You must execute these rules with absolute precision while standing in the client's home.
Move beyond the limitations of manual measurement and stationary office software. Top-tier US remodelers are already using mobile tools to bridge the gap between initial walkthroughs and finalized quotes. Leverage LiDAR-powered accuracy to capture room data in seconds. Use instant 3D visualization to prove your layout logic to clients in real-time. This modern approach eliminates measurement errors and builds the professional authority needed to secure more contracts. Stop fighting your tape measure and start delivering immediate results.
Start designing your next kitchen on-site with ArchKit today.
Build faster. Design smarter. Deliver results.
Frequently Asked Questions
What is the most efficient kitchen layout for a professional chef?
A galley layout is often considered the most efficient for professional chefs because it mimics a commercial cooking line. This setup minimizes the steps between the prep station and the heat source. It creates a high-performance cockpit where everything is within reach. For larger residential spaces, a U-shaped design with a dedicated central island also works if it maintains tight work zones and avoids traffic interference from other family members.
How much space should be between a kitchen island and the counter?
Maintain a minimum of 42 inches between an island and the perimeter countertops. If the kitchen supports multiple cooks, increase this clearance to 48 inches. This ensures that cabinet doors and appliance drawers can open fully without blocking the walkway. Accurate on-site measurements are vital here to avoid collision errors that can derail an entire project and lead to expensive cabinet re-orders.
Can the kitchen work triangle be broken in modern designs?
You can and should break the traditional work triangle in large, modern open-concept designs. The triangle fails when the perimeter exceeds 26 feet or when a large island blocks the path. Modern kitchen layout principles now prioritize "Work Zones" instead. This approach groups appliances and storage based on specific tasks like cleaning or prep, allowing for a more flexible and multi-functional floor plan.
What is the standard height for a kitchen backsplash?
The standard height for a kitchen backsplash is 18 inches. This is the vertical distance between the top of the finished countertop and the bottom of the wall cabinets. This clearance provides enough room for standard small appliances like blenders or coffee makers. If you install under-cabinet lighting or specialized molding, ensure the remaining visible space still meets this ergonomic benchmark to keep the workspace functional.
How do I calculate the best cabinet layout for a small kitchen?
Calculate a small kitchen layout by prioritizing vertical volume and high-utility hardware. Start by using 42-inch upper cabinets that reach the ceiling to maximize every available inch. Use a mobile tool like ArchKit to scan the room with LiDAR. This captures exact dimensions and wall irregularities instantly, allowing you to apply kitchen layout principles that fit maximum cabinet width without needing excessive fillers or field modifications.
What are the 5 main work zones in a kitchen layout?
The five main work zones are Consumables, Non-consumables, Cleaning, Preparation, and Cooking. Consumables include the refrigerator and pantry storage. Non-consumables cover dishes, glasses, and cutlery. The cleaning zone centers on the sink and dishwasher. The preparation zone requires the largest stretch of countertop for active work. Finally, the cooking zone houses the range, oven, and microwave to keep heat sources grouped for efficiency.
Is a galley kitchen better than an L-shaped kitchen for narrow spaces?
A galley kitchen is significantly better than an L-shaped layout for narrow, corridor-style spaces. It utilizes two parallel walls to provide double the storage and prep surface within the same footprint. An L-shaped layout requires more width to feel functional and avoid bottlenecks. If the room is less than 10 feet wide, the galley remains the undisputed champion of efficiency and contractor-friendly installation for urban remodels.
What is the minimum clearance for a dishwasher door?
The minimum clearance for a dishwasher door is 21 inches of swing space plus additional room for a person to stand beside it. In a standard 42-inch aisle, an open dishwasher door takes up roughly 25 inches, leaving 17 inches for passage. If you are designing for a high-traffic home, ensure the open door does not block access to the sink or the primary preparation zone during cleanup.


