You're standing on-site for a cabinet install. The delivery truck just pulled away. You realize the corner base unit is two inches too wide because of a missed wall protrusion. That single measurement error just cost you three weeks and thousands in re-order fees. It's a scenario every contractor dreads; yet it happens on nearly every manual survey.
We know the frustration of "close enough" measurements that fail during the final fit. It's the gap between a paper sketch and the physical reality of the room. This guide identifies the most common kitchen layout mistakes to avoid by shifting from manual guesswork to digital precision. You'll learn how to eliminate site-survey errors and prevent expensive mid-project changes using modern design principles. We'll break down the specific layout traps that kill your margins and show you how tools like ArchKit turn a risky survey into a guaranteed win. Expect faster approvals, zero-error orders, and higher closing rates.
Key Takeaways
- Identify how structural site realities and "close enough" measurements trigger the expensive revision trap.
- Replace the rigid work triangle with functional work zones to optimize kitchen flow and daily efficiency.
- Master critical clearance standards to prevent door collisions and other common kitchen layout mistakes to avoid.
- Leverage LiDAR scanning and mobile workflows to achieve 99% accuracy while eliminating manual survey errors.
- Use on-site AR visualization through ArchKit to secure faster client approvals and reduce back-and-forth revisions.
Beyond Aesthetics: Why Layout Mistakes Cost Contractors Time and Money
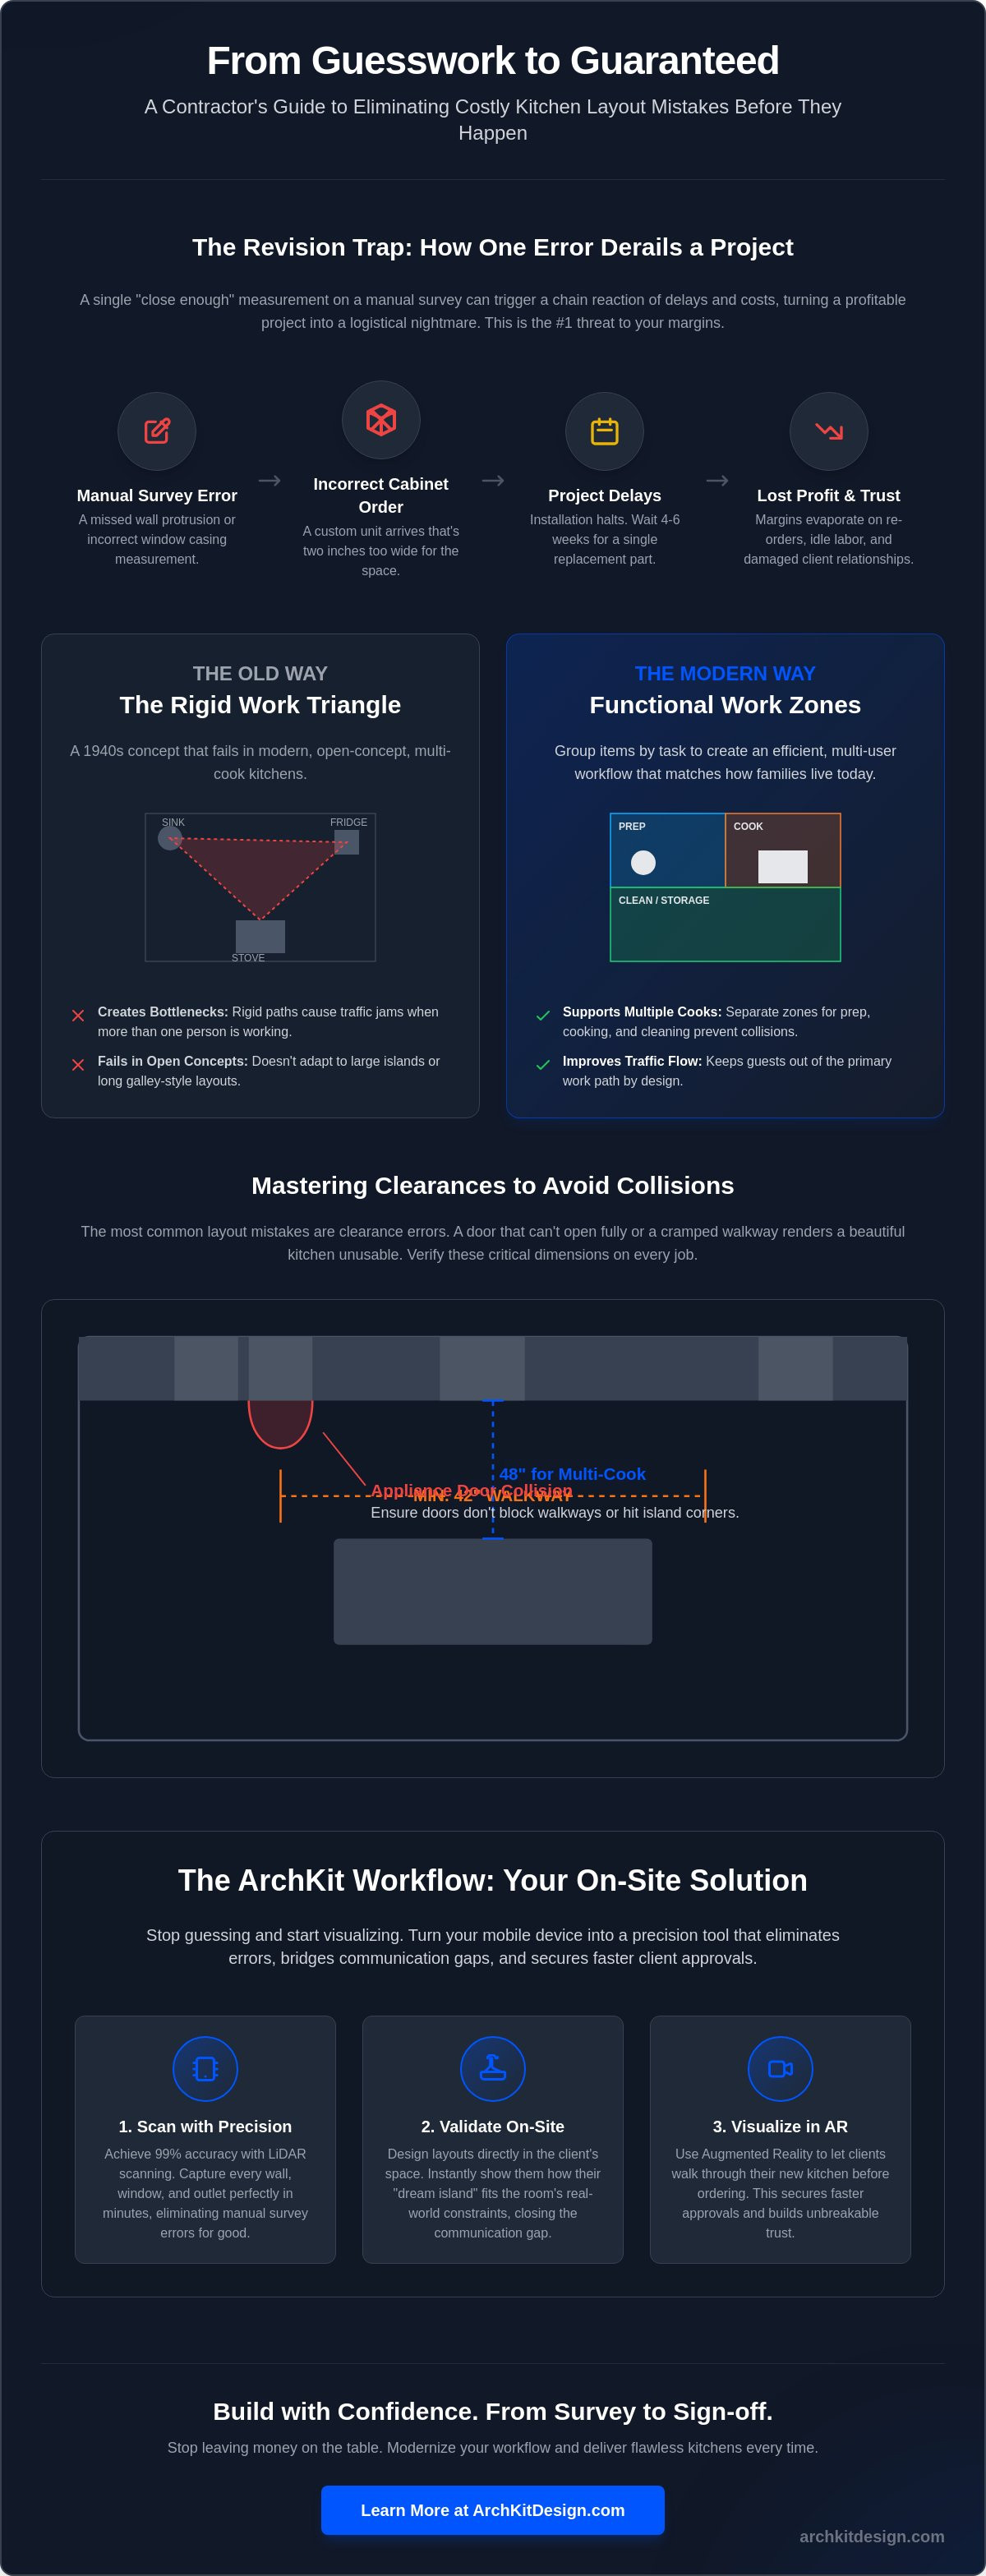
A layout mistake isn't just a design choice that looks slightly off; it's a failure to account for the physical constraints of the job site. In the world of professional remodeling, a "layout mistake" is any design element that clashes with structural reality. It might be a cabinet door that hits a radiator or a dishwasher that blocks a walkway. These errors transform a profitable project into a logistical nightmare. Identifying kitchen layout mistakes to avoid before the first hammer swings is the only way to protect your bottom line.
The real danger is the Revision Trap. A single measurement error on a site survey can trigger a chain reaction of delays. When a custom cabinet arrives two inches too wide, the entire installation halts. You aren't just losing the cost of the cabinet; you're losing labor hours, rescheduling subs, and paying for expedited shipping. Modern clients have shifted their expectations too. They no longer accept a rough 2D sketch on a notepad. They want to see the final product in their space before they sign the check. If you can't provide that clarity, you're leaving your reputation to chance. By the time you finish this guide, you'll have a clear checklist of kitchen layout mistakes to avoid to keep your projects on track.
The High Price of Mid-Project Revisions
Mid-project changes are the fastest way to kill a referral. When a contractor has to go back to the client to ask for more money or more time because of a "missing" measurement, trust evaporates. The hidden costs are staggering. Installers sit idle while waiting for a replacement unit. You might wait four to six weeks for a single custom filler or cabinet to arrive. Scrapped components that can't be returned to the manufacturer represent pure material waste. The "point of no return" is the moment the order is placed. Once those specs are at the factory, any error becomes a financial liability that usually falls on your shoulders.
Communication Gaps: Client Vision vs. Site Reality
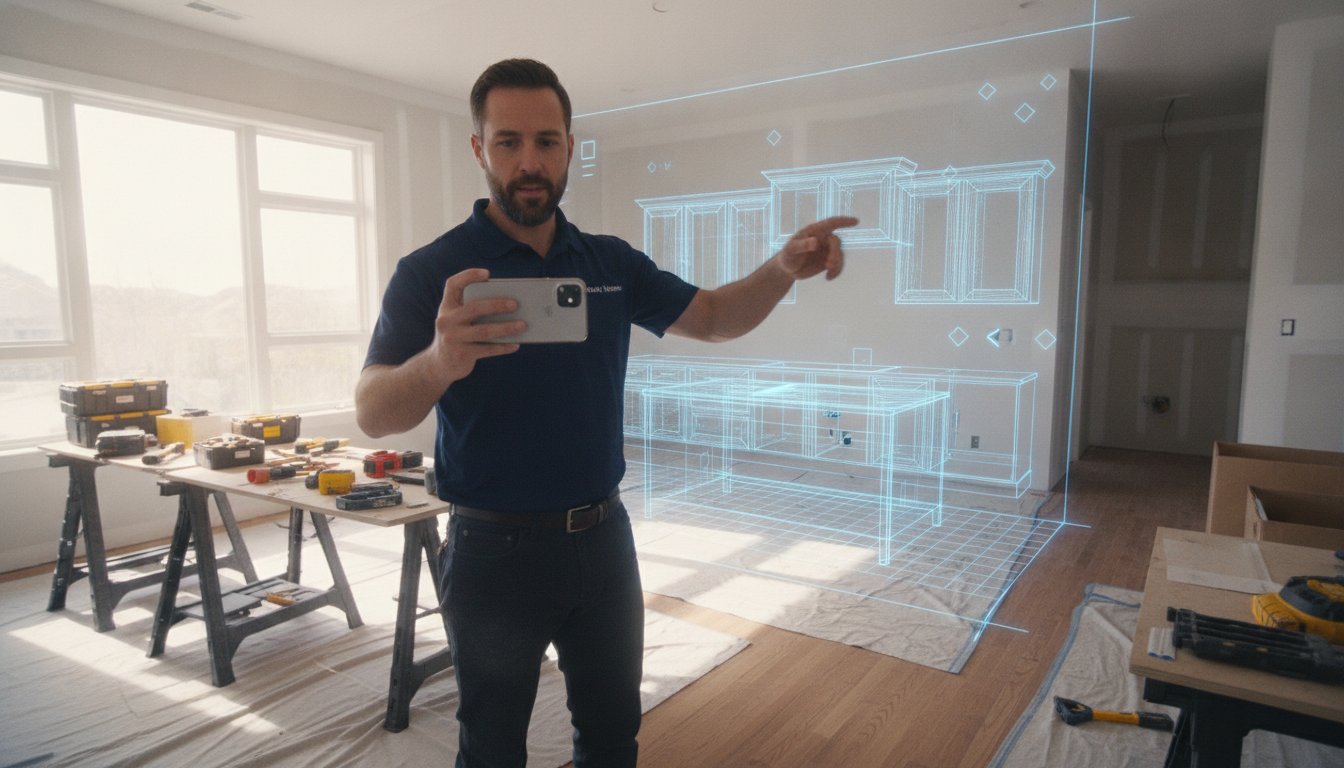
Most layout failures start with a verbal misunderstanding. A client describes their "dream island" based on a Pinterest photo, but they don't realize their kitchen lacks the clearance for a 42-inch walkway. If you don't set boundaries during the initial survey, you're setting yourself up for a conflict later. Verbal descriptions lead to mismatched expectations. You need to show them the plumbing and HVAC constraints in real-time. Using a contractor-focused kitchen design app like ArchKit allows you to overlay the design on the actual room. It turns a theoretical conversation into a concrete plan; this ensures the client understands exactly why certain layout choices are impossible before the demo starts. Stop guessing and start visualizing to close the gap between vision and reality.
Debunking the Work Triangle: Why Rigid Rules Lead to Poor Design
The traditional Work Triangle is a 1940s solution for a 2024 problem. It was designed for a single person working in a closed-off room. Today, the kitchen is the hub of the home. It’s a social space, a home office, and a multi-cook environment. Sticking too rigidly to the triangle is one of the top kitchen layout mistakes to avoid. If you force a triangle into a modern open-concept floor plan, you often end up with cramped corners and blocked walkways.
Modern efficiency relies on "Work Zones" rather than a simple geometric shape. You need to group items by task. A Prep Zone needs the trash, sink, and knives. A Cook Zone needs the range, oils, and spices. By separating these areas, you allow multiple people to work simultaneously without bumping elbows. Even high-traffic appliances like the microwave should live outside the main cooking path. This keeps guests away from the hot stove while they grab a snack. If you want to see how these zones fit in your client's specific space, you can get early access to tools that visualize these flows on-site.
The Rise of Multi-Cook Kitchens
Modern families cook together. Designing for two people requires more than just extra floor space. It requires strategic zoning. Task-based layouts allow one person to chop veggies at a secondary prep sink while another manages the main range. You aren't just placing appliances; you're managing human traffic. Look at the path from the fridge to the prep area. If it crosses the cleaning zone, you’ve created a bottleneck. Use mobile workflow tools to verify these paths before the cabinets are ordered. It’s about utility, not just appliance location.
Why the Golden Rule Fails in Open-Concept Spaces
Open-concept homes often feature massive islands and long walls. These architectural features break the triangle rule immediately. The distance between the fridge and the stove might be fifteen feet. That's a lot of walking. In these cases, the island often becomes the "Island Obstacle." If the island sits directly between the sink and the fridge, it’s a barrier, not a tool. You must plan for clear, wide walkways. Aim for 48 inches in high-traffic zones to maintain a seamless transition to the living area. Professional on-site design software helps you spot these barrier issues during the first walkthrough, ensuring the final layout feels open and functional.
The Measurement Trap: Avoiding Costly Clearance and Flow Errors
A single inch can kill a kitchen project. It’s the difference between a drawer that glides open and one that slams into the oven handle. These "1-inch mistakes" are the most common kitchen layout mistakes to avoid during a site survey. Manual tape measurements often miss the subtle protrusions of window trim or baseboard heaters. If your plan doesn't account for these, your custom cabinets won't fit. You'll face a three-week delay for a re-order.
Standardize your clearance goals early. While 36 inches is the technical minimum for a walkway, it feels cramped in a modern home. Aim for 42 inches for single-cook spaces and 48 inches for high-traffic zones. This isn't just about comfort; it's about liability. If a client can't open their fridge while someone is at the sink, they'll blame the contractor. For tighter footprints, using a small kitchen layout planner is essential to maximize every square inch without sacrificing flow. Every millimeter matters when the footprint is fixed.
Don't forget the "landing strips." Every major appliance needs adjacent counter space. A range without 12 to 15 inches of landing area on either side is a safety hazard. A fridge without a nearby spot to set groceries is a functional failure. These details are often lost in 2D sketches but become obvious when using on-site kitchen design workflow tools like ArchKit. Capture the site. Verify the clearance. Order with confidence.
Door Swings and Drawer Collisions
Corner cabinets are the primary danger zone. Always check the clearance for handles and decorative hardware. A 1.5-inch shaker handle can easily block an adjacent drawer from opening. The "dishwasher trap" is another frequent site error. Ensure the open dishwasher door doesn't block access to the sink or the trash pull-out. Finally, verify the fridge depth. A standard fridge often sticks out 6 to 8 inches past the cabinet box. If you don't account for that protrusion, you'll choke the main aisle and ruin the kitchen's flow.
Aisle Widths for Multi-Person Households
Measure from the furthest protrusion, not the cabinet box. This includes appliance handles, towel bars, and countertop overhangs. A 42-inch aisle quickly shrinks to 38 inches once you add a pro-style range handle. Analyze the traffic flow patterns. The kitchen shouldn't be a primary thoroughfare to the backyard or garage. If it is, you need wider aisles to prevent collisions. For island seating, allow at least 15 inches of knee clearance and 24 inches of width per person. Getting these dimensions right on-site prevents the revision trap and ensures a professional finish.
Storage and Lighting Myths: Functionality Over "The Look"
Clients often push for aesthetics that clash with daily utility. One of the most common kitchen layout mistakes to avoid is prioritizing the initial cabinet cost over long-term storage utility. Contractors frequently hear that "doors are cheaper than drawers." While the invoice might be lower, the functional loss is massive. Deep base cabinet drawers allow clients to access the full depth of the unit without kneeling on the floor. This is a major selling point for aging-in-place renovations and high-end remodels alike.
Layouts must also respect standard U.S. cabinet increments. Standard boxes come in 3-inch widths. If you design a layout that ignores these increments, you'll end up with massive, unsightly fillers that waste valuable real estate. In small footprints, ignoring vertical storage is another critical error. Take the cabinets to the ceiling. It provides extra space for seasonal items and eliminates the "dust shelf" at the top. To ensure your storage plan fits the structural reality of the site, get early access to our on-site design tools and verify your clearances before the order is finalized.
Lighting is the final piece of the functional puzzle. Many contractors fall into the "Swiss Cheese" ceiling trap. They install too many recessed cans in a grid pattern. This creates a flat, clinical atmosphere with harsh shadows. Effective lighting requires layers. You need task lighting for prep work, ambient lighting for the room, and accent lighting for the mood. If you don't plan the switch locations and dimming zones during the layout phase, you're building a kitchen that's hard to use after dark.
The Drawers vs. Doors Debate
Drawers offer superior ergonomics. They bring the contents to the user. For a contractor, suggesting a "drawer-heavy" base layout increases the project’s ROI and client satisfaction. Deep drawer systems maximize every cubic inch of storage. They prevent items from being lost in the dark corners of a standard shelf. While the hardware cost is higher, the installation time is often similar. It’s a high-value upgrade that makes the kitchen feel more professional and custom.
Lighting Layers vs. General Illumination
Task lighting is non-negotiable. LED strips under upper cabinets illuminate the primary prep zones where the cook's body would otherwise block the ceiling lights. Pendant placement is another frequent fail point. Standard practice suggests 30 to 36 inches above the counter, but you must account for the client’s height and sightlines. Integrate your lighting controls into the initial layout. Don't wait until the rough-in to decide where the switches go. A well-placed 3-way switch near the entrance can be the difference between a functional space and a daily frustration.
Modernizing the Workflow: Using AR to Eliminate Mistakes On-Site
Manual tape measures are the weak link in your project lifecycle. They invite human error. They lead to the exact kitchen layout mistakes to avoid that drain your profits and stall your crews. Shifting to LiDAR scanning provides 99% accuracy in seconds. You aren't just taking a measurement; you're capturing the entire structural reality of the room. This digital foundation eliminates the "1-inch mistake" that ruins custom cabinet orders before they ever leave the factory.
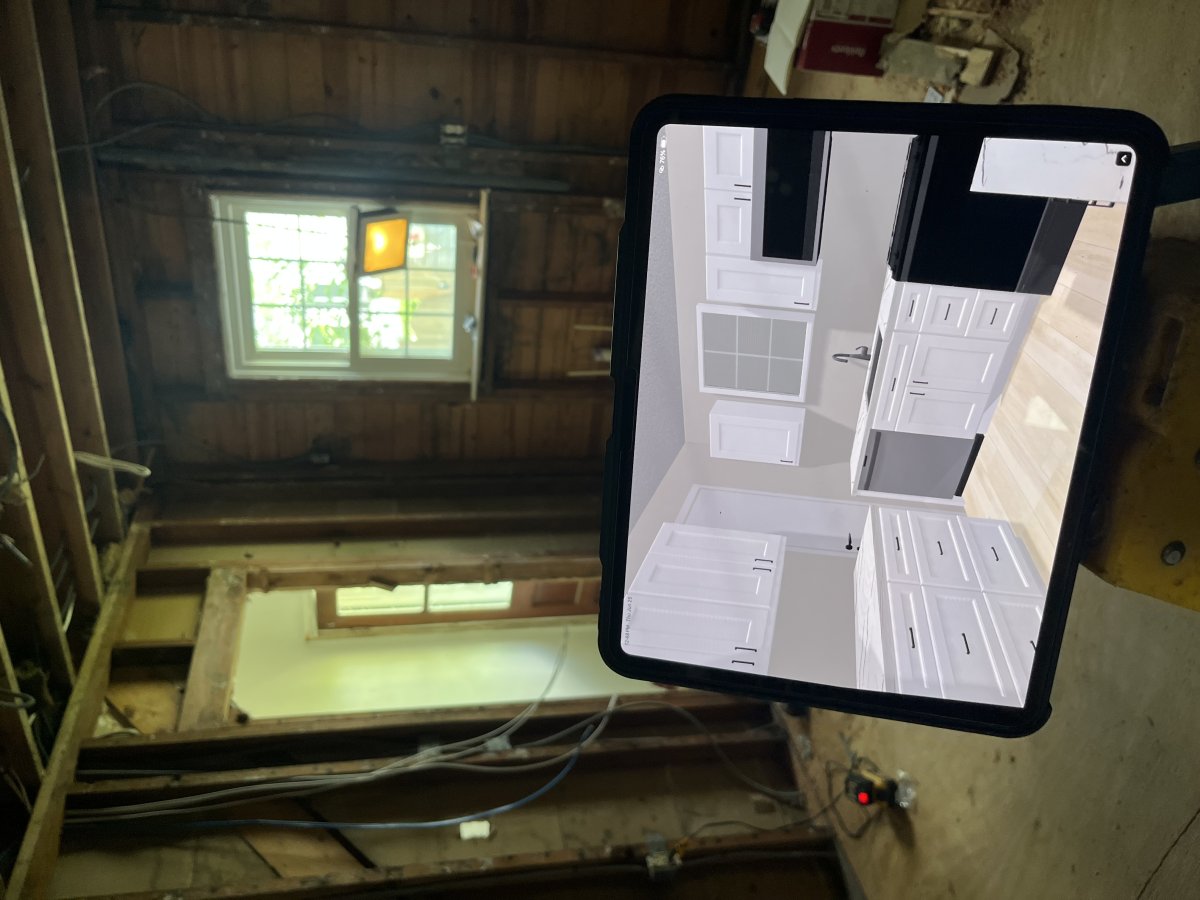
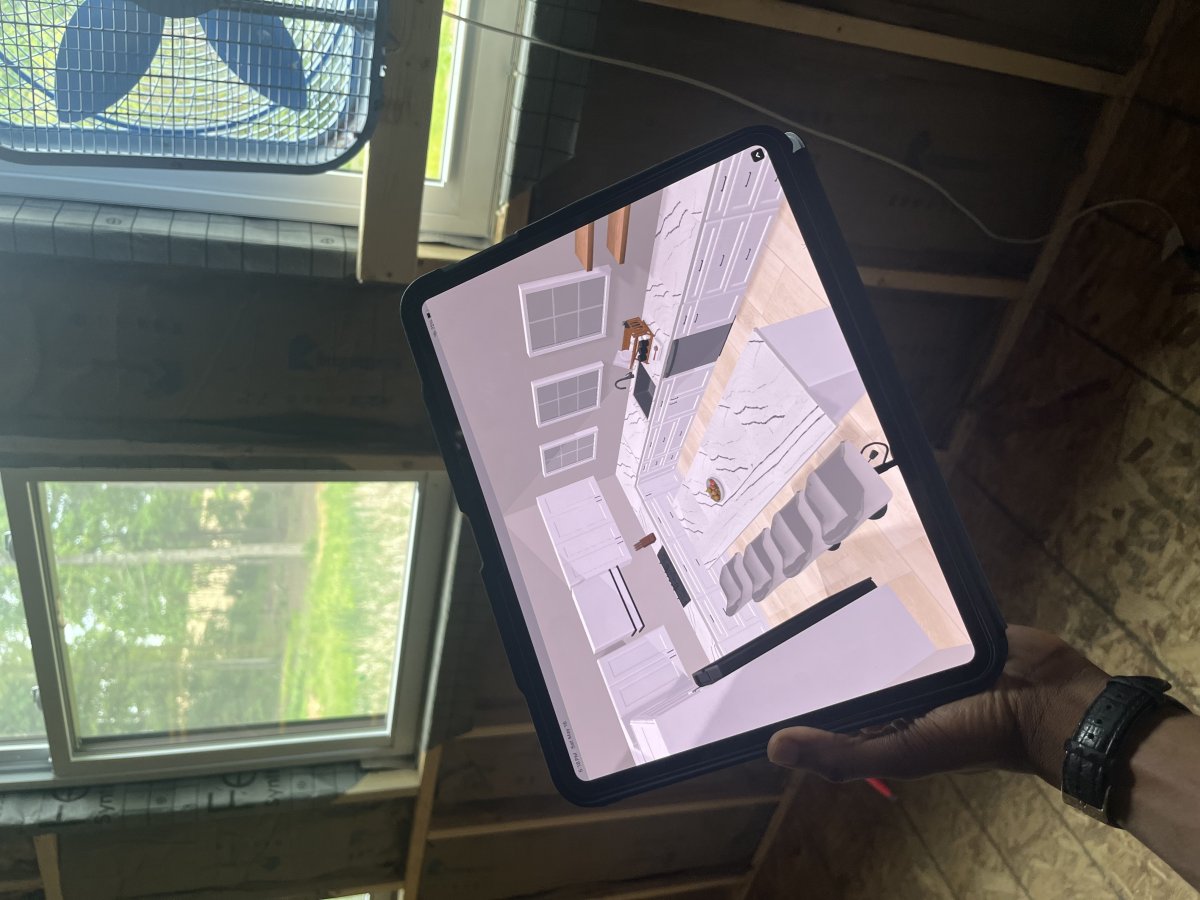
Using Augmented Reality (AR) allows you to show clients real-time layout changes while standing on the job site. It removes the psychological barrier of "not being able to see it." When a homeowner sees their new island in 3D through ArchKit, the conversation shifts from "maybe" to "when do we start." You can drop standard cabinet sizes directly into the scan to verify every clearance on the fly. This "Instant Approval" advantage means you can secure the contract before you even pack up your tools.
Visualizing Cabinet Catalog Sizes in Real-Time
Testing clearances is no longer an office task. With a kitchen design app for contractors, you can swap between an L-shape and a galley configuration in seconds. Walk through the virtual aisles. Check the door swings. If the dishwasher door hits the island in the AR model, you fix it instantly. You don't wait for a delivery truck to discover a collision on install day. This real-time visualization kills the "I can't picture it" objection and builds immediate confidence in your expertise.
Reducing Measurement Friction with LiDAR
Manual site surveys are slow. They're prone to fatigue and missed details like window trim or plumbing protrusions. LiDAR scanning automates the capture of every wall angle and obstacle. A single scan generates 2D floor plans and 3D models automatically. This reduces measurement friction and ensures your estimates are 100% accurate. You'll win more bids by providing professional, tech-forward presentations that your competition can't match. You eliminate the kitchen layout mistakes to avoid by replacing manual guesswork with digital precision.
Take Control of Your Next On-Site Survey
Eliminating the most common kitchen layout mistakes to avoid requires a fundamental shift in how you capture site data. You've seen how a single measurement error snowballs into weeks of delays and thousands in lost labor. Moving past the rigid work triangle into functional, task-based zones is the first step toward a seamless install. The second is ditching the manual tape measure for good.
By integrating LiDAR-powered accuracy and AR visualization into your initial walkthrough, you remove the guesswork. You can test standard U.S. cabinet catalog sizes against the physical room in real-time. This provides instant client approval and ensures your final order fits perfectly. It turns a stressful survey into a professional demonstration that secures the contract before you leave the driveway. Stop letting manual errors eat your margins.
Stop guessing on-site. Get early access to ArchKit and scan your next project in 3D.
Modernize your trade. Protect your margins. Deliver the perfect kitchen every time.
Frequently Asked Questions
What is the most common kitchen layout mistake?
The most frequent error is failing to account for physical site constraints like window trim or plumbing protrusions during the initial survey. These "1-inch mistakes" are primary kitchen layout mistakes to avoid because they trigger expensive cabinet re-orders and labor downtime. Always capture the structural reality of the room before finalizing your design to ensure a perfect fit on install day.
How much space should be between a kitchen island and a counter?
Aim for 42 inches of clearance between an island and a counter for a single-cook kitchen. If the space serves as a high-traffic thoroughfare, bump that distance to 48 inches. While 36 inches is the technical minimum, it creates bottlenecks that lead to client dissatisfaction. Use a digital tool to verify these clearances on-site before the cabinets are ordered.
Is the kitchen work triangle still relevant in 2026?
The traditional work triangle is largely obsolete in modern open-concept homes and multi-cook households. Modern kitchens function better with task-based "Work Zones" dedicated to prep, cooking, cleaning, and storage. This approach accommodates multiple people working simultaneously and prevents the cramped corners common in rigid triangle designs.
How do I avoid cabinet doors hitting each other in a corner?
Install a filler strip of at least 1.5 to 2 inches in every corner to prevent hardware collisions. Always measure the depth of the specific cabinet handles and appliance grips you plan to install. If you don't account for these protrusions, drawers will slam into handles and ruin the finish of the adjacent unit.
What are the rules for kitchen lighting placement?
Focus on layered lighting rather than a generic grid of recessed cans in the ceiling. Place task lighting directly over prep areas, typically using LED strips under upper cabinets. Position island pendant lights 30 to 36 inches above the countertop and ensure they don't block the client's line of sight across the room.
Can I use an app to check my kitchen layout on-site?
Yes, professional tools like ArchKit allow you to verify your layout directly on-site using LiDAR and AR. You can scan the room to create a 3D model and drop in virtual cabinets to test clearances. This helps you identify kitchen layout mistakes to avoid while you're still standing in the room with the client.
What is the minimum aisle width for a two-cook kitchen?
A 48-inch aisle is the professional standard for any kitchen intended for two cooks. This width allows two people to pass each other comfortably without colliding. It also ensures that a dishwasher or oven door can stay fully open without blocking the entire walkway for others.
How do I account for appliance depth in my layout?
Always measure the full depth of the appliance including the door and the handles. A standard refrigerator often protrudes 6 to 8 inches beyond the face of a 24-inch deep cabinet box. If you don't plan for this extra depth in your layout, you'll choke your aisle widths and disrupt the overall flow of the kitchen.